


Saturday, 21 September 2013

This is a very simple tutorial perfect for the absolute beginner and absolutely adorable.
Materials needed:
- Yarn in your choice of belly and body colour (8ply prefered)
- Crochet hook no larger than 4.00mm (I used 3.00mm)
- 6mm safety eyes
- Needle and Thread
- Stuffing
- Scissors
Video Tutorial:
Body:
Start with belly colour
R1: 6SC Magic circle
R2: (INC)x6 (12)
R3: (INC, 1)x6 (18)
R4: (INC, 2)x6 (24)
R5: (2, INC, 1)x6 (30)
change to body colour
R6-9: EVEN (30)
R10: (1, DEC, 2)x6 (24)
R11: 3, DEC, 6, DEC, 6, DEC, 3 (21)
R12: 2, DEC, 3, DEC, 3, DEC, 3, DEC, 2 (17)
R13: DEC, 1, DEC, 2, DEC, 1, DEC, 2, DEC, 1 (12)
Insert eyes and stuff at this stage
R14: (DEC)x6 (6)
ST finish off and thread tail through outter stitch and pull tight
Arms: make two
R1: 4SC Magic circle
R2: (INC)x4 (8)
R3: EVEN (8)
ST finish off
Tail: make two
R1: 4SC Magic circle
R2: (INC)x4 (8)
R3-4: EVEN (8)
ST finish off
Assembly:
Stitch on the arms onto the sides of the body and the two tail pieces together at the butt of the body.
Optional you could also make it look like the whale is spouting water by gluing some stuffing onto a headpin and putting it into the whale's blowhole.
And you are done~
Happy crafting~
Kim ^^
Thursday, 12 September 2013

I'm always hesitant with amigurumi tutorials but here we go with a very basic and easy Ice-cream in a waffle cone tutorial.
Materials needed:
- Yarn in Tan and you choice of Ice-cream colour (8ply prefered)
- Crochet hook no larger than 4.00mm (I used 3.00mm)
- Needle and Thread
- Stuffing
- Scissors
- Pins
- Small red pompom+head pin (optional for cherry)
Video tutorial:
Waffle Cone:
R1: 3SC Magic Circle
R2: (INC)x3 (6)
R3: (INC, SC)x3 (9)
R4: (2SC, INC)x3 (12)
R5: EVEN (12)
R6: (INC, 3SC)x3 (15)
R7: EVEN (15)
R8: (INC, 4SC)x3 (18)
R9: EVEN (18)
ST and finish off
Ice-cream:
R1: 6SC Magic Circle
R2: (INC)x6 (12)
R3: (INC, SC)x6 (18)
R4: (INC, 2SC)x6 (24)
R5: EVEN (24)
R6: (2SC, DEC)x6 (18)
R7: EVEN (18)
R8: (ST, 2DC in same ST)x9 (18)
ST and finish off
Make as many ice-creams as you want the more stacked the more amazing ^^
Assembly:
Stuff everything well, pin them together and sew away.
For the cherry, your headpin should be able to easily pierce through the pompom and you can either stitch it onto the top of the ice-cream or glue it on.
You have now completed the amigurumi~
Happy hooking everyone ^^
Kim <3
Thursday, 5 September 2013

It's been a hard challenge but I've done it even though I'm about 4 days late.
Don't think I'll be able to handle another challenge like this for awhile but it was fun while it lasted.
I actually had about 4 things related to kpop when I wrote a list of what I wanted to make for each day but throughout the month I cut it down to just 2 xD I also changed day 31 from Kyu from Super Junior to the EXO badge so it was kpop either way...I can't help the fangirl in me even though I'm pretty sure about 80%+ of my subscribers don't know anything about kpop...
I also tried balancing the number of amigurumis vs felt plushes and quite pleased I didn't do 11 amigurumis.
Anywho here is the video if you want a more thorough look at everything:
Vist this for Anna's plushies:
http://www.youtube.com/watch?v=nOxdPxN-zCQ
She also had links for other people who participated in her update 2#
I hope you all have a lovely day
Kim~
Thursday, 29 August 2013

I recently discovered Bary san while looking through the Line app's sticker collection and thought it was really cute that he carries around a boat xD The only thing I know about him is that he is a mascot representing the city of Imabari (Ehime) in Japan. I thought he would be the perfect candidate for my next felt tutorial so here we go:
Please use this template in order to follow the tutorial:
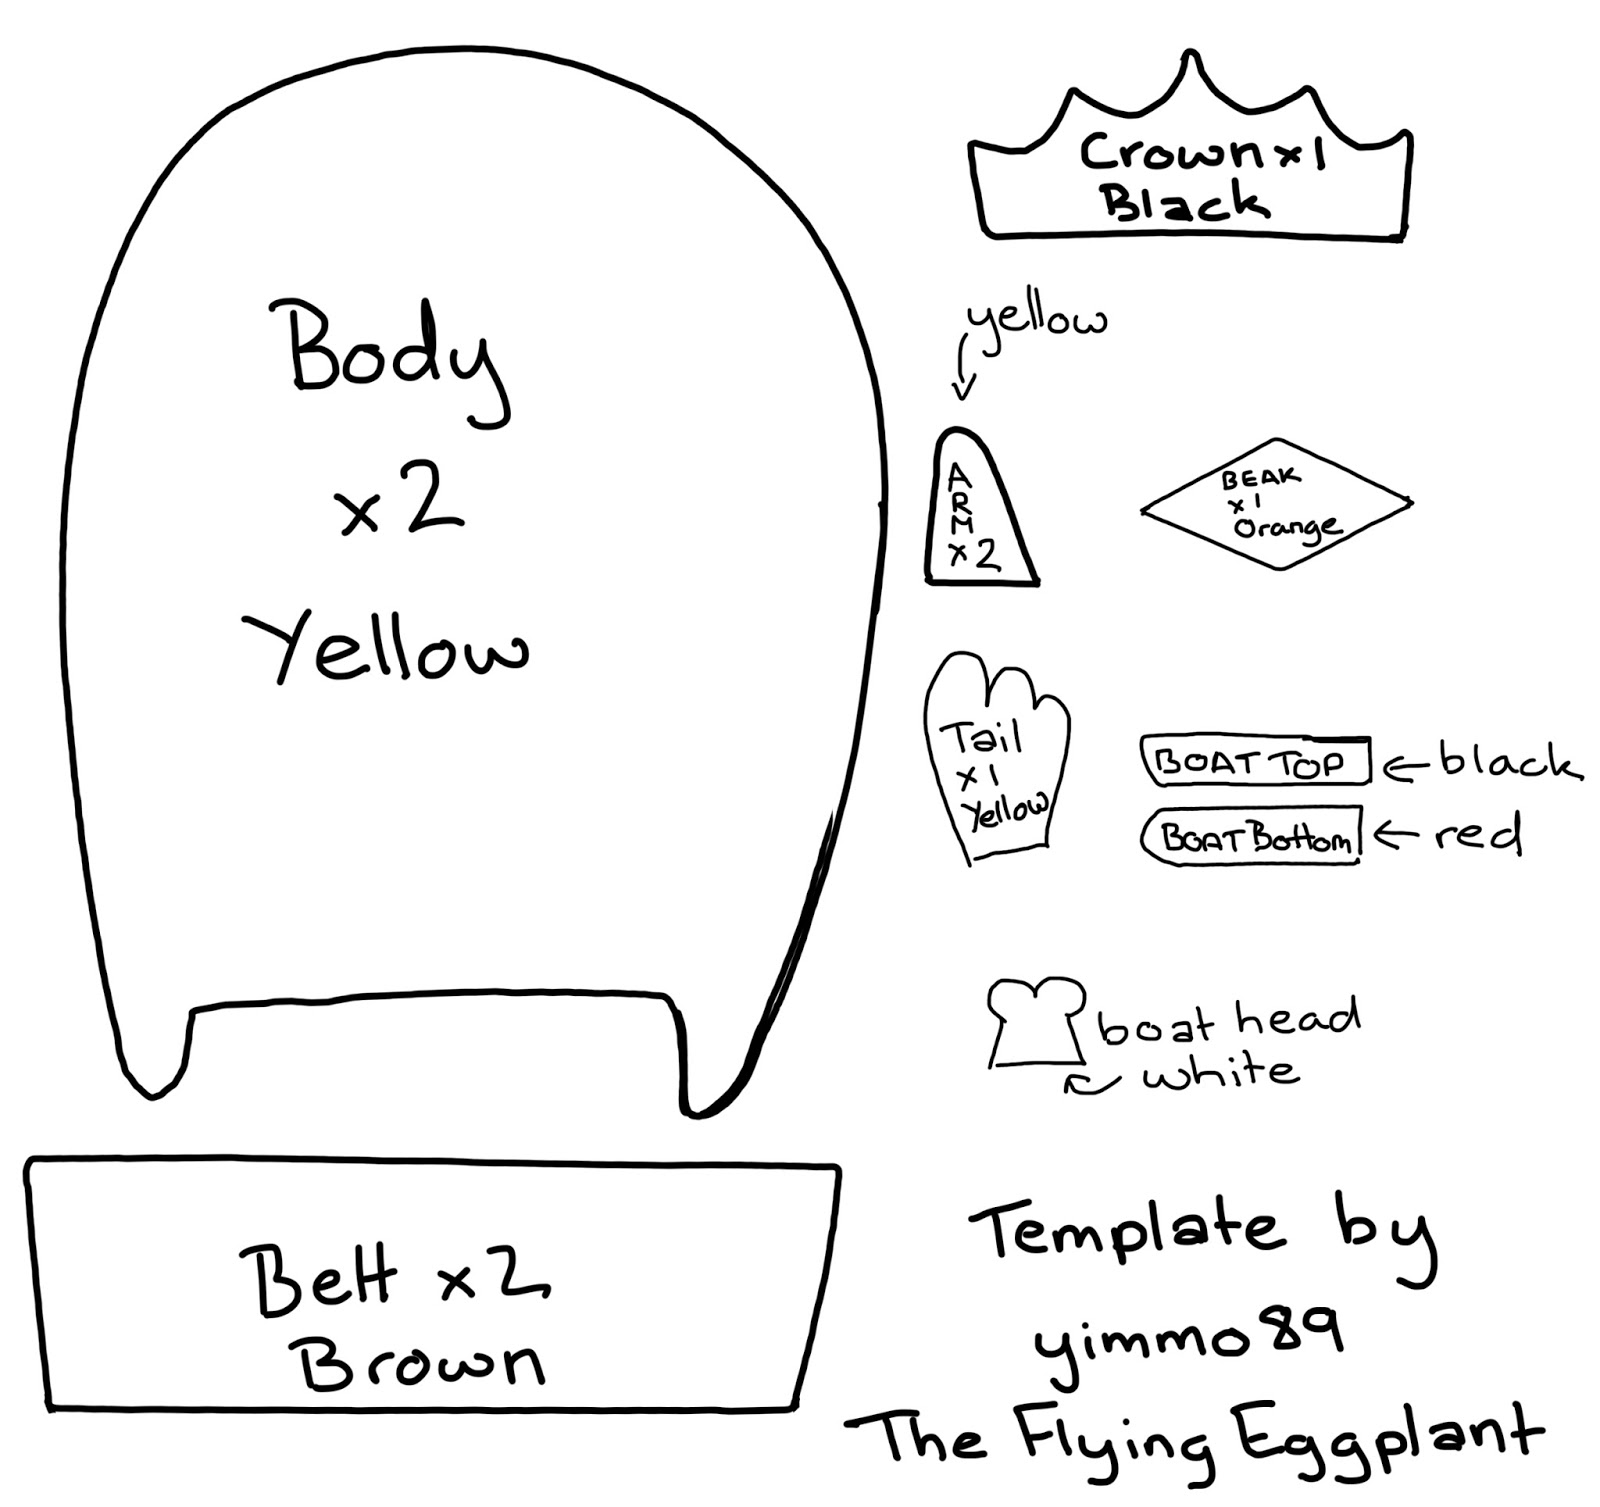
Notice that I didn't add the eyes since it's just two black dots :)
Please feel free to send me photos if you decide to make him.
Happy Crafting
Kim <3
Saturday, 24 August 2013

These 10 days have been super hard to keep up with to the point where I even left day 12 to last minute because I honestly don't have a favourite felt colour since I'm mostly crochet oriented and ended up just picking my favourite colour which is baby blue.
As you will see in the video I made more amigurumis than before, simply because they're just quicker and easier to make for me. I had a complete fail with the coffee using felt as you would know if you follow my facebook and was too tired to correct the wrong so went for an amigurumi especially since I was behind schedule.
I really do try and conjure up ideas using felt but I'm so bad at felt plushies combined with the time restriction I can't help but jump to my hook and make an amigurumi instead. I worked on the felt coffee for about an hour whereas it only took me like 15 minutes to throw together the ami coffee.
It's quite upsetting about Mouton because I used my better quality felt, the thicker sturdier type D: But it helps me for future references if I ever want to make a plush of a similar body type so it isn't all in vain.
Hopefully the last 11 days won't kill me as much as these 10 days.
Thursday, 15 August 2013

I'll be showing you how to make a cream puff out of felt in the video provided.
It's a very simple, fun and relatively quick project you can make.
It's very customisable as you can choose and different toppings of your choice whether it be strawberry sauce or maybe even fruit or no toppings at all, it's all up to you ^^
What you need will be:
- Scissors,
- Some form of fake chocolate sauce: I used Daiso's glass paint (optional)
- Paint brush
- Needle and Thread (white)
- Dotting tool (can use anything to dot the paint on with)
- White paint
- Tan and white felt
- Pen and pencil for tracing
- Pastels for shading
- Any circular object
- Stuffing: I used hobbyfill
Happy Crafting~!
Kim <3
Friday, 9 August 2013

During the month of August a fellow YouTuber Annascraftytrends has suggested everyone to take on her plushy challenge which involves making one plush for each day of August with the designated theme she has chosen on her calendar. For more info please check the video down below.
I've decided to update for every 10-10-11 days just so I don't end up with a giant pile to showcase in one go. I am however showing each plush I make for each day on my facebook page yimmo89 if you're interested in seeing progress.
For now here's a video on what I've done so far:
Have a great day and happy crafting ^^
Kim <3
Subscribe to:
Posts (Atom)
Popular Posts
-
 This is a very simple tutorial perfect for the absolute beginner and absolutely adorable. Materials needed: - Yarn in your choice of ...
 -
 Just in time before Halloween make these cute and completely simple witch brooms. Materials: - Yarn in dark brown and a colour suitabl...
 -
Hello fellow crafters and browsers :D From a few requests I have made a tutorial for my baby alpaca/llama. Please watch the video below an...
-
 I'm always hesitant with amigurumi tutorials but here we go with a very basic and easy Ice-cream in a waffle cone tutorial. Materia...
