
Monday, 28 October 2013

Just in time before Halloween make these cute and completely simple witch brooms.
Materials:
- Yarn in dark brown and a colour suitable for the broom bristle (I use 8ply)
- Crochet hook (I use 3mm)
- Scissors
- Glue
Method:
Making the stick
Using your dark brown
R1: 5SC Magic circle
R2-19: EVEN (5)
ST and finish off
Using your bristle coloured yarn cut about 30-40 (maybe more or less depending on the effect you want) 9cm strips. They don't need to be completely accurate as you will be trimming so parts down when you shape it.
Grab your stick and arrange the bristle strips as evenly as you can around the end of the stick (where you ST) towards the toplike shown in the photo below.

You will notice there is still a big hole in the middle of all the bristles, this is where the glue comes in. Squeeze some glue into the middle of the bristles and squish it together. You can stop here but to make it more of a cone shape trim some of the outer strips.
If you crocheted the stick tight enough you should be able to mold it to look like the completed product to make it look like a witch will sit and ride on it.
The broom is now complete. I hope that without a video this is still understandable, don't hesitate to ask me if you don't understand anything.
Happy Crafting :)
Kim
Sunday, 20 October 2013

Halloween is almost here and I have for you guys another amigurumi tutorial.
It's very simple but also very cute and very customisable :)
Video Tutorial:
Materials:
- Yarn in your choice of cauldron colour (I use 8ply)
- Crochet hook (I used 3mm and 3.5mm)
- Stuffing
- Wire (I used a bobby pin and head pin)
- Jewellery pliers
- Your choice of decorations
Method:
Using your choice of cauldron yarn:
R1: 6SC Magic circle
R2: INCx6 (12)
R3: (INC, 1)x6 (18)
R4: (INC, 2)x6 (24)
R5: (2, INC, 1)x6 (30)
R6: (INC, 4)x6 (36)
R7: (INC, 5)x6 (42)
R8-12: EVEN (42)
R13: (5, DEC)x6 (36)
R14: (4, DEC)x6 (30)
R15: (1, DEC, 2)x6 (24)
R16-17: EVEN (24)
R18: (2, INC, 1)x6 (30)
R19: (8, DEC)x3 (27)
ST finish off
Curl the opening of the cauldron down to make the top boarder.
Stuff the cauldron but don't make it too neat, you want some of it to be sticking out to give it an over boiling effect.
Using ur jewellery pliers bend your wire into a sort of horseshoe shape and thread it through the top boarder of the cauldron.
You're now free to decorate your cauldron with any type of 'ingredients' as you'd like.
I personally used some googly eyes, snake eyes, salmon yarn for fake worms and polymer clay cane slices.
Be creative and have fun.
If you end up making one feel free to head on over to my Facebook page and show me a photo.
Happy Crafting ^^
Kim
Thursday, 10 October 2013

As a few of my subscribers may have noticed I have been working on my Adventure Time crochet update for a very long time. It would've been done much sooner if I wasn't so lazy. I'm also sad that I couldn't get a Marceline done because I couldn't find yarn matching her skin tone. Although I'm also wrong with a lot of the colours in a few of the characters I couldn't find any yarn close to Marceline's skin colour.
Video for thorough look at them all:
Lady Rainicorn:

The hardest part about this was deciding how I was going to do the hair, in the end I went with fleece although it's coming apart a bit.
I knew that crocheting the horn wouldn't of looked so nice so I used modelling clay and put a headpin through it that way if I ever what to change it I can easily remove it
LSP:

I thought I was going to have problems with positioning the lumps and I was sort of right but as you can tell from the photo it's not noticable.
Really happy with how she turned out and I wasn't left in a stressful mess after finishing her like most of my amis.
BMO:

I had a bit of trouble with the little details especially the BMO and as you can see the M isn't really recognisable but I still think it's cute non the less.
The back is really deformed and ugly but hey, no ones gonna see anything but the front.
I also couldn't find an exact match to BMO's body colour so went with a turquoise that leaned more on the green side.
Princess Bubblegum:

I had problems figuring how to do her jewel and ended up colouring a black dot eye with nail polish. The crown is just very disproportionate but her hair isn't the same length on both sides which I don't have a clue how that could be looking at my pattern so the OCD in me has my eye twitching.
There's more I could critique about this but I'll leave it at that before this turns to an essay @.@
Jake:

Originally he had a more toyish plain black eye but decided to swap them for the proper eyes and like it a lot better that way
The only thing I think I would try to improve it I were to make him again are the ears.
Finn:

I'm not exactly sure how I can make his nubby ears without having it concave in where the ear meets the head.
I also couldn't find the right blues for his clothes but I don't think it's too obvious.
The facial expression is also a wee bit creepy but I sort of like that aspect of it.
It's like a weight off my shoulder to finally get this done so I can move onto my next series set which I'm letting people on my Facebook page vote on.
Happy Crafting~
Kim <3
Thursday, 3 October 2013

In preparation for Halloween I decided to make a tutorial on a candy corn amigurumi. I've never actually seen a candy corn in real life and I think this is pretty normal for Australians as a lot of us don't celebrate Halloween, but I've definitely seen my fair share on American shows and other things.
Materials:
- Yarn in yellow, orange and white (I use 8ply)
- Crochet hook no larger than 4mm (I use 3mm)
- Stuffing (I use hobbyfill)
- Scissors
- Stitch marker (optional
Video Tutorial:
Method:
Starting with the yellow yarn you want to CH 16
Now from the second ch to the hook SC15
In the same CH we just SC make an increase
We then SC13 and INC to give us 32 stitches
All of that will be regarded as R1.
R2: (15, INC)x2 (34)
R3: (15, INC, INC)x2 (38)
R4-5: EVEN (38)
R6: 16, DEC, 17, DEC, 1 (36)
R7: (16, DEC)x2 (34)
R8: change to orange yarn - EVEN (34)
R9: (15, DEC)x2 (32)
R10-12: EVEN (32)
R13: (14, DEC)x2 (30)
R14: EVEN (30)
R15: (DEC, 13)x2 (28)
R16: (12, DEC)x2 (26)
R17: (DEC, 11)x2 (24)
R18: (6, DEC)x3 (21)
R19: change to white yarn - EVEN (21)
R20: (5, DEC)x3 (18)
R21: (DEC, 4)x3 (15)
R22: (DEC, 3)x3 (12)
R23: (2, DEC)x3 (9)
R24: (1, DEC)x3 st and finish off (6)
Close the hole neatly by threading the tail through the outer stitches and pull tight.
Note: you can change colour anywhere you'd like during the pattern (if you don't want as much orange as mine), but the instructions are to create the same on as the photo indicated
I would like to point out that I made this pattern on the spot of making the tutorial so it isn't a perfect shape but hope you guys still like it.
If you make this I would love to see a photo which you can send to any of my social medias :)
Happy crafting,
Kim <3
Saturday, 21 September 2013

This is a very simple tutorial perfect for the absolute beginner and absolutely adorable.
Materials needed:
- Yarn in your choice of belly and body colour (8ply prefered)
- Crochet hook no larger than 4.00mm (I used 3.00mm)
- 6mm safety eyes
- Needle and Thread
- Stuffing
- Scissors
Video Tutorial:
Body:
Start with belly colour
R1: 6SC Magic circle
R2: (INC)x6 (12)
R3: (INC, 1)x6 (18)
R4: (INC, 2)x6 (24)
R5: (2, INC, 1)x6 (30)
change to body colour
R6-9: EVEN (30)
R10: (1, DEC, 2)x6 (24)
R11: 3, DEC, 6, DEC, 6, DEC, 3 (21)
R12: 2, DEC, 3, DEC, 3, DEC, 3, DEC, 2 (17)
R13: DEC, 1, DEC, 2, DEC, 1, DEC, 2, DEC, 1 (12)
Insert eyes and stuff at this stage
R14: (DEC)x6 (6)
ST finish off and thread tail through outter stitch and pull tight
Arms: make two
R1: 4SC Magic circle
R2: (INC)x4 (8)
R3: EVEN (8)
ST finish off
Tail: make two
R1: 4SC Magic circle
R2: (INC)x4 (8)
R3-4: EVEN (8)
ST finish off
Assembly:
Stitch on the arms onto the sides of the body and the two tail pieces together at the butt of the body.
Optional you could also make it look like the whale is spouting water by gluing some stuffing onto a headpin and putting it into the whale's blowhole.
And you are done~
Happy crafting~
Kim ^^
Thursday, 12 September 2013

I'm always hesitant with amigurumi tutorials but here we go with a very basic and easy Ice-cream in a waffle cone tutorial.
Materials needed:
- Yarn in Tan and you choice of Ice-cream colour (8ply prefered)
- Crochet hook no larger than 4.00mm (I used 3.00mm)
- Needle and Thread
- Stuffing
- Scissors
- Pins
- Small red pompom+head pin (optional for cherry)
Video tutorial:
Waffle Cone:
R1: 3SC Magic Circle
R2: (INC)x3 (6)
R3: (INC, SC)x3 (9)
R4: (2SC, INC)x3 (12)
R5: EVEN (12)
R6: (INC, 3SC)x3 (15)
R7: EVEN (15)
R8: (INC, 4SC)x3 (18)
R9: EVEN (18)
ST and finish off
Ice-cream:
R1: 6SC Magic Circle
R2: (INC)x6 (12)
R3: (INC, SC)x6 (18)
R4: (INC, 2SC)x6 (24)
R5: EVEN (24)
R6: (2SC, DEC)x6 (18)
R7: EVEN (18)
R8: (ST, 2DC in same ST)x9 (18)
ST and finish off
Make as many ice-creams as you want the more stacked the more amazing ^^
Assembly:
Stuff everything well, pin them together and sew away.
For the cherry, your headpin should be able to easily pierce through the pompom and you can either stitch it onto the top of the ice-cream or glue it on.
You have now completed the amigurumi~
Happy hooking everyone ^^
Kim <3
Thursday, 5 September 2013

It's been a hard challenge but I've done it even though I'm about 4 days late.
Don't think I'll be able to handle another challenge like this for awhile but it was fun while it lasted.
I actually had about 4 things related to kpop when I wrote a list of what I wanted to make for each day but throughout the month I cut it down to just 2 xD I also changed day 31 from Kyu from Super Junior to the EXO badge so it was kpop either way...I can't help the fangirl in me even though I'm pretty sure about 80%+ of my subscribers don't know anything about kpop...
I also tried balancing the number of amigurumis vs felt plushes and quite pleased I didn't do 11 amigurumis.
Anywho here is the video if you want a more thorough look at everything:
Vist this for Anna's plushies:
http://www.youtube.com/watch?v=nOxdPxN-zCQ
She also had links for other people who participated in her update 2#
I hope you all have a lovely day
Kim~
Thursday, 29 August 2013

I recently discovered Bary san while looking through the Line app's sticker collection and thought it was really cute that he carries around a boat xD The only thing I know about him is that he is a mascot representing the city of Imabari (Ehime) in Japan. I thought he would be the perfect candidate for my next felt tutorial so here we go:
Please use this template in order to follow the tutorial:
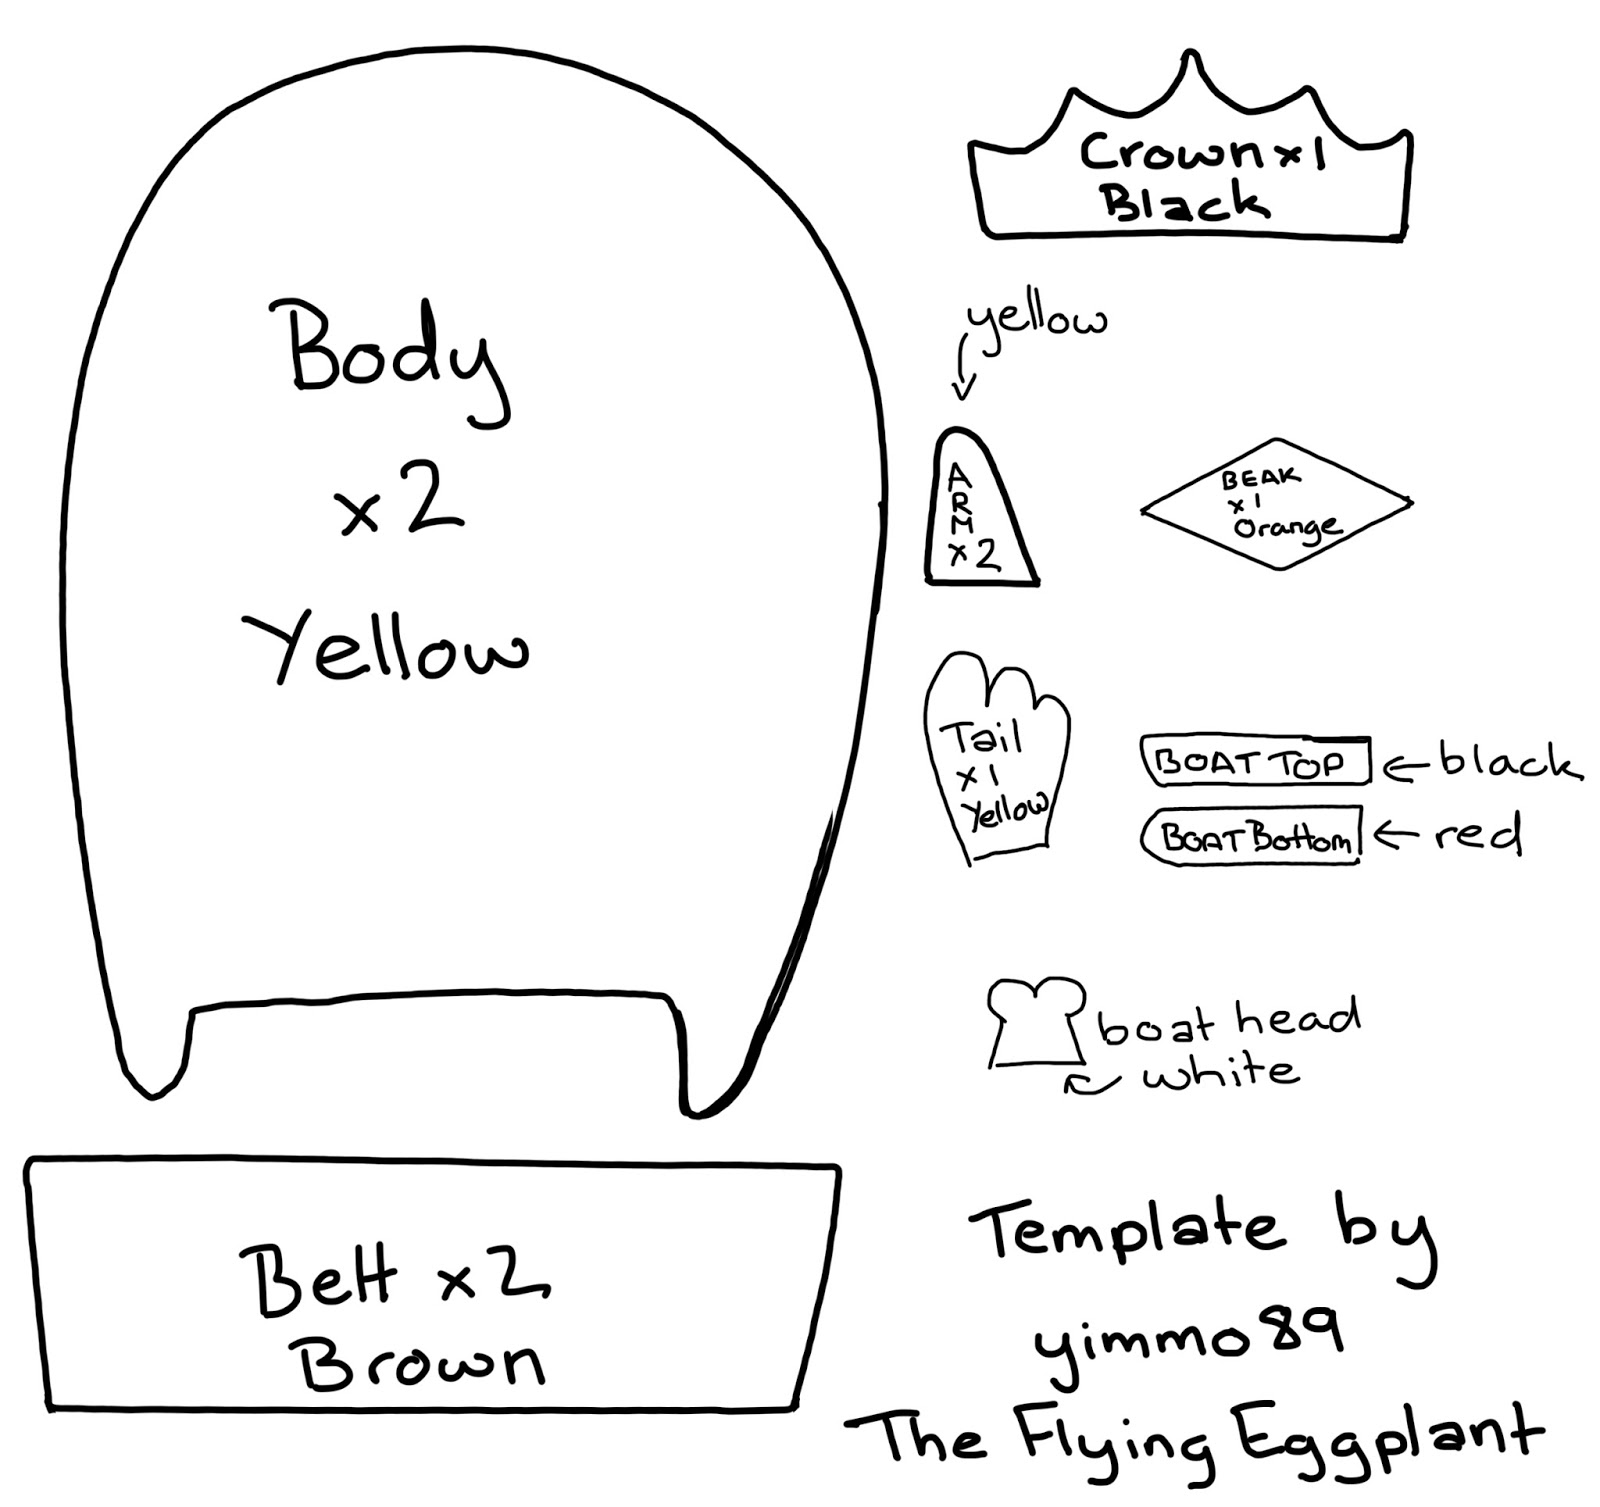
Notice that I didn't add the eyes since it's just two black dots :)
Please feel free to send me photos if you decide to make him.
Happy Crafting
Kim <3
Saturday, 24 August 2013

These 10 days have been super hard to keep up with to the point where I even left day 12 to last minute because I honestly don't have a favourite felt colour since I'm mostly crochet oriented and ended up just picking my favourite colour which is baby blue.
As you will see in the video I made more amigurumis than before, simply because they're just quicker and easier to make for me. I had a complete fail with the coffee using felt as you would know if you follow my facebook and was too tired to correct the wrong so went for an amigurumi especially since I was behind schedule.
I really do try and conjure up ideas using felt but I'm so bad at felt plushies combined with the time restriction I can't help but jump to my hook and make an amigurumi instead. I worked on the felt coffee for about an hour whereas it only took me like 15 minutes to throw together the ami coffee.
It's quite upsetting about Mouton because I used my better quality felt, the thicker sturdier type D: But it helps me for future references if I ever want to make a plush of a similar body type so it isn't all in vain.
Hopefully the last 11 days won't kill me as much as these 10 days.
Thursday, 15 August 2013

I'll be showing you how to make a cream puff out of felt in the video provided.
It's a very simple, fun and relatively quick project you can make.
It's very customisable as you can choose and different toppings of your choice whether it be strawberry sauce or maybe even fruit or no toppings at all, it's all up to you ^^
What you need will be:
- Scissors,
- Some form of fake chocolate sauce: I used Daiso's glass paint (optional)
- Paint brush
- Needle and Thread (white)
- Dotting tool (can use anything to dot the paint on with)
- White paint
- Tan and white felt
- Pen and pencil for tracing
- Pastels for shading
- Any circular object
- Stuffing: I used hobbyfill
Happy Crafting~!
Kim <3
Friday, 9 August 2013

During the month of August a fellow YouTuber Annascraftytrends has suggested everyone to take on her plushy challenge which involves making one plush for each day of August with the designated theme she has chosen on her calendar. For more info please check the video down below.
I've decided to update for every 10-10-11 days just so I don't end up with a giant pile to showcase in one go. I am however showing each plush I make for each day on my facebook page yimmo89 if you're interested in seeing progress.
For now here's a video on what I've done so far:
Have a great day and happy crafting ^^
Kim <3
Thursday, 25 July 2013
From the very beginning I've been very interested in Japanese amigurumi patterns and books. They seem more innovative and the overall quality of patterns seem to stand out.
I had been eyeing this particular book for awhile and decided to cave in and buy it even though the $15.29USD seemed a bit steep for me. I was also wary of the fact that it was in 100% Japanese and I had never tried following a Japanese style amigurumi pattern. Upon receiving the book I quickly discovered this wasn't a problem because there are very clear step by step pictures at the back showing what to do for each symbol. As long as you know the basics this book shouldn't be a problem at all and if you get stuck you can just quickly flip to the back to search up what a symbol means.
There are a total of 12 projects in the book, spreading out to around 20 patterns because of each individual fruit and colour combinations. There are also clear colour photos of each project so you know what you're going to make. A problem I think some people might encounter is not having the right yarn colour; certainly more than 10. I didn't have a problem with this because I tend to hoard yarn in any colour I can get my hands on...
The pattern details are very clear letting you know where each row starts and finishes. A few aspects I found nice about the patterns were that they let you know how many pieces of each pattern you needed to make for each project, provide a column showing how many stitches you need for each row as well as approximately how large in cms that your pattern should end up. I personally found it helpful to know katakana (english sounding Japanese characters) as it made it quicker for me to identify what I was making but it isn't necessary as each pattern is also coloured in the colour of yarn you're supposed to use and if needed you can look at the real photo for reference.
The only problem I ran across was what sized hook I was supposed to use, I'm sure it must state it somewhere in the book but because I can't read Japanese I wasn't sure as there were many different mm references throughout the book. I used a 2.5mm hook for all the the normal sized patterns and a 1.25mm hook for the smaller keychain sized patterns and everything turned out nicely sized. A 3.5mm hook also worked out for the taiyaki as I ended up snapping my 2.5mm hook so the patterns are versitile enough between hooks.
The book can be purchased online here:
http://www.ebay.com.au/itm/Sweets-Amigurumi-Japanese-Craft-Book-/360432988680?pt=US_Crocheting_Knitting_Patterns&hash=item53eb7af208
If you live in Japan then it only sells for 500yen which is equivalent to around $6 so rather cheap.
My verdict is if you are confident in your crochet basics then this book is a very nice purchase for your book collection. With patterns for pouches, keychains and containers it's not only super adorable but practicle as well so perfect for gifting as well.
I hope you give this book a look as it's well worth the money.
Happy Crafting ^^

I've put my Charmander pattern up for sale on Etsy and it being my first time trying to sell anything of this nature I am super nervous about if I've done anything wrong or not made my instructions clear enough.
I'm not expecting any sales off the bat as there are many Charmander patterns for sale on Etsy but the fact that I've put it out there to the world is an achievement for me. Await anxiously for any feedback in the following months.
With positive feedback I hope in the future I am more confident in my work and am able to make better quality work that I can be unwaveringly proud of.
If you have spare time I appreciate it if you took a look at the listing, there is no need to buy, I am happy just with the thought that someone had enough interest to take a look ^^
I hope each and everyone of you have a wonderful and amazing day :)
Thursday, 18 July 2013
Hello to whoever's reading this~
I am currently holding an all crafts contest for reaching 1000 subscribers on YouTube so if you are interested please give it a watch thank you ^_^
Here is info on the contest:
Rules & Regulations:
- Must be a subscriber
- Be 18yrs old+ or have parents permission
- All crafts accepted: clay, sewing, needlework etc
- Drawings must have progress proof through video or photo
- All items must be made specifically for this contest
- Must be a video response to THIS video (will not search for entries)
- Video no longer than 10 minutes
- Must stick to themes, any non themed crafts will automatically disqualify you
- Not necessary to send BUT additional prizes will be added if you do
- No slideshows
- Minimum 6 items, no maximum
- Like & Favourite this video
- No badmouthing
- Can choose multiple themes from the list
- Linked charms, accessories will not be counted as a seperate item
- Deadline is August 31st, no extensions
- Contest will be cancelled if there are less than 5 entries
THEMES:
All Studio Ghibli: brownie points awarded for
- Howl's Moving Castle
- Princess Mononoke
- Laputa Castle in the Sky
Disney: cannot choose other Disney
- The Lion King
- Aladdin
- Pocahontas
- Mulan
Sentimental Circus: no other san-x
Video Games: cannot choose other games
- Professor Layton
- Ace Attorney
- Anything Final Fantasy
- Ni No Kuni
- Silent Hill
Anime: cannot choose other animes
- NANA
- Death Note
- Cardcaptor Sakura
- One Piece
- Full Metal Alchemist
Tuesday, 9 July 2013
Hi guys, it's been awhile since my last post. Lifes been busy and I've finally finished a set of amigurumis which was requested by one of my subscribers.
At the beginning I tried making pokemon true to the actual pokemon but after dratini I sort of gave up and went chibi with everything. I personally prefer the way the chibis look but that could just be me.
Added a jewellery piece just because I wanted to make use of my eyelet tool for the first time, I think it turned out well but I don't think I'd ever use it ^^"
These are all my pattern with the exception of Umbreon.
For Pikachu I was inspired by this photo: http://minjixmuu-chan.deviantart.com/art/Pika-Pika-200142673
I followed this Umbreon pattern: http://wolfdreamer-oth.blogspot.com.au/2010/08/umbreon-plushie.html


I only took photos of Dratini and Horsea because it felt like too much effort for the other ones not to mention the Umbreon isn't my pattern. I think the footage of the other ones are sufficient :)
I would love to hear some feedback as well as any request you might have~! I look forward to trying to keep a regular update!
I hope you all have a wonderful day!
Happy Crafting ^^
Tuesday, 7 May 2013
For those who are at a beginner level of sewing like me this is an easy and cute gift for Mother's Day.
I know mine is messy but I really just wanted to show you guidelines so you guys can make super cute personalised designs~!
 If you want to make the exact same design as me you'll need:
- 2 different fabric designs
- 6"x4" photo frame
- Embroidery hoop
- Embroidery needle
- Embroidery Floss
- Sewing Needle and coordinating thread
- Scrapbook paper
- Scissors
- Fleece
If you're crafty I'm sure you'll have most of these supplies at hand.
Would love to see photos if you guys make it and Happy Crafting ^^
I know mine is messy but I really just wanted to show you guidelines so you guys can make super cute personalised designs~!

- 2 different fabric designs
- 6"x4" photo frame
- Embroidery hoop
- Embroidery needle
- Embroidery Floss
- Sewing Needle and coordinating thread
- Scrapbook paper
- Scissors
- Fleece
If you're crafty I'm sure you'll have most of these supplies at hand.
Would love to see photos if you guys make it and Happy Crafting ^^
Sunday, 28 April 2013
I've been rather busy and not crafting as much as I'd like but I got a request from someone to make a Hatsune Miku in my last update so I gave it a go.
Little did I know it was going to give me hell. For one I have ZERO knowledge of Vocaloids or Hatsune so I had to do some research.
The hair was such a hassle, I tried to replicate my Link hair but sadly failed...
Another problem was I couldn't find any photos of her back so I just gave her vest a triangle slit.
I'm also trying to get into sewing more so gave a macaron coin purse a go and awaiting my mum to come back from Vietnam with cheap fabric for me to start trying my hand at sewing clothes~
Do check out my video for a more detailed view of everything:


I'm looking forward to improving my sewing skills but so far I haven't budged at all...
Monday, 8 April 2013
I've been on a roll with anime/games themed amigurumis but I still need a lot more designs if I want to set up shop at August's Manifest ><
I hope I'm able to attend this year as a trader!
I've mentioned in the video I won't be posting any tutorials for those particular items because they are quite complex but thinking about it I may be able to do the no face.
If you can please let me know what type of design you'd like to see and possibly buy at a convention:)


Hope you liked everything and have a nice day~
Stay Crafty ^^
Friday, 29 March 2013
.JPG)
Materials:
1.5mm hook
2ply yarn
Needle
Thread
Yarn needle
Super glue
Ring base
Method:
Head:
R1. 6SC Magic circle
R2. (INC)x6 (12)
R3. (INC, 1)x6 (18)
R4. (INC, 2)x6 (24)
R5. (INC, 3)x6 (30)
R6. EVEN (30)
R7. (3, DEC)x6 (24)
R8. (2, DEC)x6 (18)
R9. (1, DEC)x6 (12)
R10. (DEC)x6, ST
Earsx2:
R1. 4SC Magic circle
R2. (INC)x4 (8)
R3-6. EVEN (8)
ST
Flatten the head piece taking brown or black yarn and french knot on some eyes using the yarn needle and add a mouth.
Using the appropriate thread attach the ears to the head.
Super glue the head to the ring base and you are done, a cute and simple handmade ring :)
Happy crafting~
Monday, 18 March 2013
.JPG)
Pins
1.5mm and 3.5mm/2.5mm hook
Something velco
Face template
Scissors
Pompom (optional)
Plastic eyes
Felt
Needle
Thread
2ply yarn
8ply yarn
Stuffing
Method:
Body:
R1. 6SC magic circle
R2. (INC)x6 (12)
R3. (INC, 1)x6 (18)
R4. (INC, 2)x6 (24)
R5-9. FULL (24)
R10. (2, DEC)x6 (18)
R11. (1, DEC)X6 (12)
R12. (DEC)X6 (6) st to finish
Head:
R1. 6SC magic circle
R2. (INC)x6 (12)
R3. (INC, 1)x6 (18)
R4. (INC, 2)x6 (24)
R5. (3, INC)X6 (30)
R6. FULL (30)
R7. (DEC, 3)X6 (24)
R8. (2, DEC)x6 (18)
R9. (1, DEC)X6 (12)
R10. (DEC)X6 (6) st to finish
Earsx2:
R1. 3SC magic circle
R2. (INC)x3 (6)
R3. (INC, 1)x3 (9)
R4-6. FULL (9) st
Armsx4:
R1. 4SC magic circle
R2. (INC)x4 (8)
R3-5. FULL (8) st
Stitch everything in the appropriate areas.
Using the face template fold it in half and stitch along where the triangle cutout is.
Flip it over so the stitched part isn't showing and stitch it onto the head.
Make sure you don't stitch the face flat because to want to stuff it a little so it pertrudes.
Resize the template to about 80% if you're using the 2.5mm hook instead of the 3.5mm.

I use 4mm eyes for the 2.5mm hooked llama and 5mm eyes for the 3.5mm hook llama.
Now you can either add the pompom to the back for a fluffy tail or not, totally optional.
And you are done :D
Feel free to link me some images if you guys end up making this and please be sure to credit me
Happy Crafting ^^
Saturday, 9 March 2013
Hello guys~
So this will be the first time, with my knowledge of being featured anywhere.
Although something small it does make me feel somewhat proud of how far I've come :)
If you would like to know more about me please feel free to check out the link provided below.
The Craft Gossiper feature
On other news, my brother is getting engaged at the end of the month and working on a little couple amigurumi for them, hope I can get it done in time and will be sure to update you guys when I'm done :)
Wednesday, 27 February 2013
Crochet Update
I've been having a harder time motivating myself to crochet but non the less I have finally made enough that I'm comfortable making a craft update.
Do have a look at the video to see everything and in more detail :)
I recycled the YouTube thumbnail as I am waayy too tired to try and make anything. The way I edited and filmed was also different and I'm not too sure how I feel about it, I will try and improve my skills for the future but think I will stick with the normal still shots and talking for now.


I've got other things in the update but currently don't have any photos for them.
I hope that these can give you ideas and inspiration to crochet.
All of these were my own pattern so please do not claim them as your own.
Happy Crafting guys, Kim <3
I've been having a harder time motivating myself to crochet but non the less I have finally made enough that I'm comfortable making a craft update.
Do have a look at the video to see everything and in more detail :)


I've got other things in the update but currently don't have any photos for them.
I hope that these can give you ideas and inspiration to crochet.
All of these were my own pattern so please do not claim them as your own.
Happy Crafting guys, Kim <3
Subscribe to:
Posts (Atom)
Popular Posts
-
 This is a very simple tutorial perfect for the absolute beginner and absolutely adorable. Materials needed: - Yarn in your choice of ...
 -
 Just in time before Halloween make these cute and completely simple witch brooms. Materials: - Yarn in dark brown and a colour suitabl...
 -
Hello fellow crafters and browsers :D From a few requests I have made a tutorial for my baby alpaca/llama. Please watch the video below an...
-
 I'm always hesitant with amigurumi tutorials but here we go with a very basic and easy Ice-cream in a waffle cone tutorial. Materia...
